


Before you start
Two things are required before starting:
- Two files covering the transactions you want to compare. A bank statement and a ledger, a payout report and an invoice list, or any similar pair. CSV and Excel both work.
- A shared column that identifies the same transaction in both files. A Reference, Transaction ID, Invoice No., or Document No. This becomes the matching column.
That is the full list. Column headers do not need to match between files, date formats do not need to be identical, and neither file needs to be cleaned before you start. None of that belongs on this list because none of it is something you need to prepare. It gets handled during mapping, covered below.
Bank reconciliation using CSV exports means comparing two flat files, usually a bank statement export and a ledger, invoice list, or payment processor report, to confirm that every transaction on one side has a matching transaction on the other. Anything that does not match gets investigated: a timing difference, a fee that was never recorded, a duplicate entry, or a transaction that is missing entirely.
This is different from reconciling inside an accounting system's bank feed. A live feed compares two things, your bank and your ledger, and only when they are connected. The moment a third file enters the picture, a Stripe payout report, an ad platform invoice, a client's own export, the live feed stops being useful. You are back to comparing files directly.
Reconcile runs that comparison in four steps, shown at the top of every reconciliation: Upload files, Map columns, Confirm match rules and tolerances, Get report. This guide walks through all four, plus the export work that happens before and the investigation that happens after.
Step 1: Export Both Files at the Source
Pull the bank statement directly from the bank's portal, and the second file, ledger, payment processor report, or invoice list, directly from its source. Avoid retyping or copying values into a new spreadsheet first. Every manual step is a chance for a number to change before you have even started comparing.
If the bank offers a choice of export format, CSV is the safer option. PDF statements require a conversion step that introduces its own chance of error.
One thing worth checking here, not because it is required but because it is the most common source of false results: confirm both files cover the same period. If the bank statement runs March 1 through 31 and the ledger runs March 1 through April 5, every transaction in that extra five days will show up as missing on one side, not because anything is actually missing, but because the second file simply has more in it. That is a date range mismatch, not a data problem, and it is worth ruling out before investigating exceptions that are not real.
Step 2: Upload Files
Open Reconcile and use the Start New Reconciliation card. There are two slots, and the distinction matters for how the report reads later:
- Source file: the main file to check. Put the bank statement here.
- Comparison file: the file to match against. Put the ledger here.
Drag each file in or click to upload, then click Start Reconciliation. Column headers, date formats, and file structure do not need to match between the two files. One file might read 03/14/2026 and the other 2026-03-14T00:00:00Z; both are read as dates.
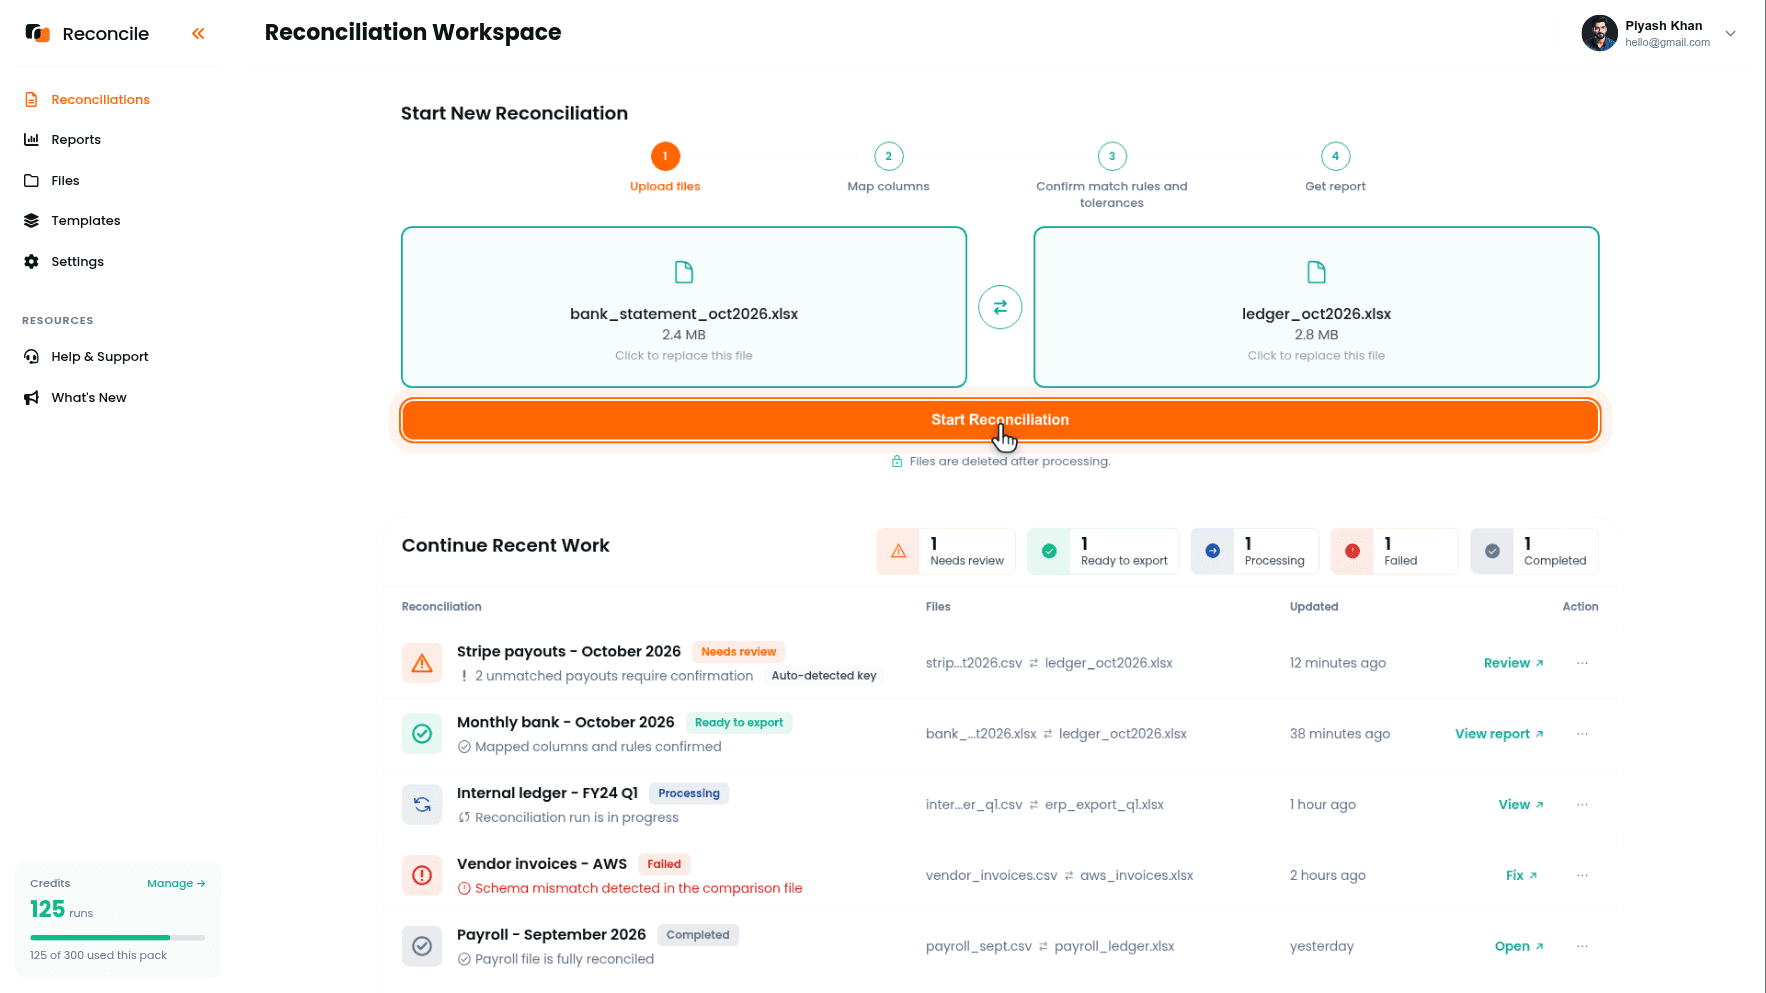
Both file cards stay visible through every step that follows, each showing the file name, row count, size, and format, so there is never a question of which file is which. Files are deleted after processing.
Step 3: Map Columns
Two files describing the same transactions rarely use the same field names. The bank statement might call a field Description while the ledger calls the equivalent field Memo. This step pairs them up, and decides which fields are worth checking at all.
Select columns to map. Reconcile lists every column it found in the source file. Tick only the ones that need to be compared. Reference, Transaction Date, Amount, and Description cover most bank reconciliations. Everything left unticked, running balances, internal batch IDs, cost centers, stays out of the comparison entirely.
Preview selected columns. As you tick columns, a live preview shows sample rows from the source file, so you can confirm each column contains what its header claims before going further.
Map columns between files. Pair each selected source column with its equivalent in the comparison file using the searchable dropdown on each row: Reference to Memo Ref, Transaction Date to Entry Date, Amount to Amount, Description to Narrative. Then click Continue.
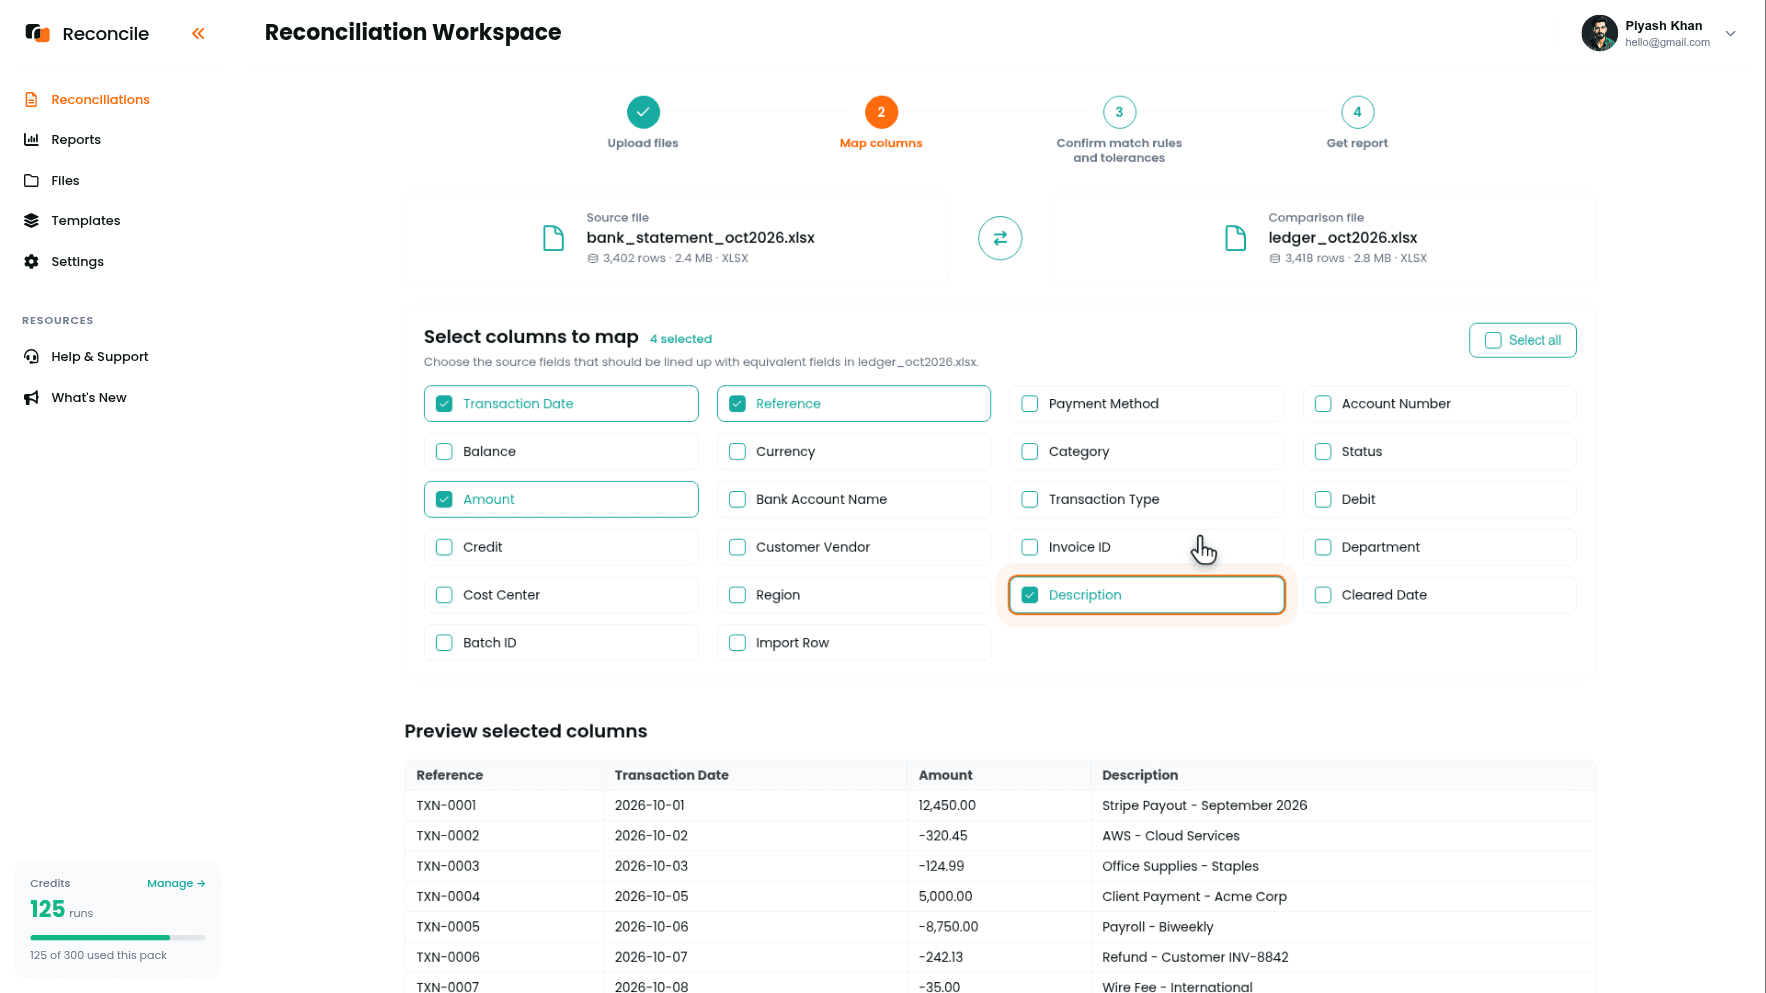
Selecting a column and mapping it are the two halves of one decision: which fields describe the same thing, and where each lives in the other file. Which mapped pair identifies the transaction is a separate decision, and it comes next.
Step 4: Confirm Match Rules and Tolerances
Reconcile analyzes the mapped columns and suggests the matching column, the pair that identifies the same transaction on both sides. The suggestion card reads:
We suggest matching on: Reference → Memo Ref
with the reasons listed under Why this match?: high uniqueness in both files, a consistent transaction reference pattern, strong overlap across sampled rows. If the suggestion is right, keep it. If the files share a better identifier, pick it under Or choose a different column. The Preview match key values table shows sample values from both columns side by side, with a count of how many values matched across the files, so you can see the key working before committing to it.
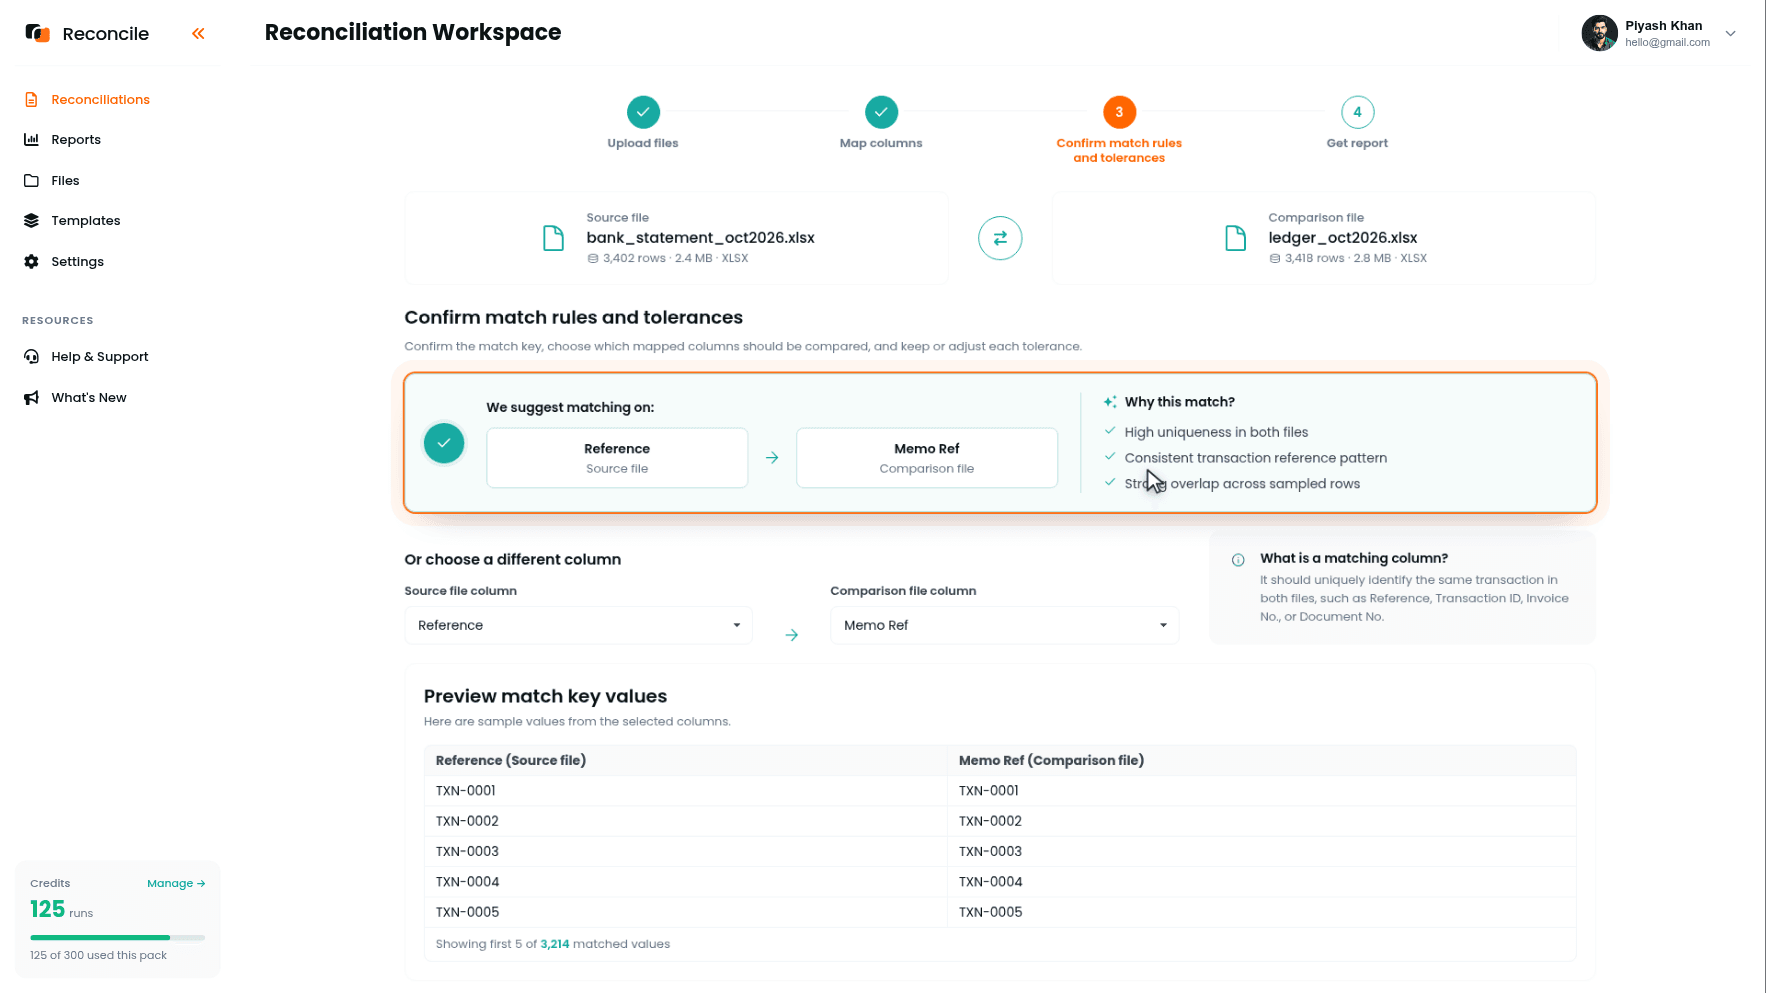
A matching column and a mapped column are different things. Mapping says which fields describe the same thing. The matching column says which mapped pair identifies the same transaction. An amount column is a clean mapping but a poor identifier on its own, since many transactions share the same amount.
Below the suggestion, Confirm comparison rules and tolerances lists every other mapped pair with its detected type and a tolerance:
- Transaction Date / Entry Date: Date/time field, within 1 day
- Amount / Amount: Numeric field, ±0.50
- Description / Narrative: Text field, exact match
Keep or adjust each one. A tolerance absorbs known, explainable variance: a payment that posts a day late is a timing difference, not a missing transaction, and a few cents of rounding is not a real discrepancy. Set tolerances deliberately, not generously. A tolerance that is too wide hides real discrepancies.
When the rules look right, click Get report.
Step 5: Read the Report
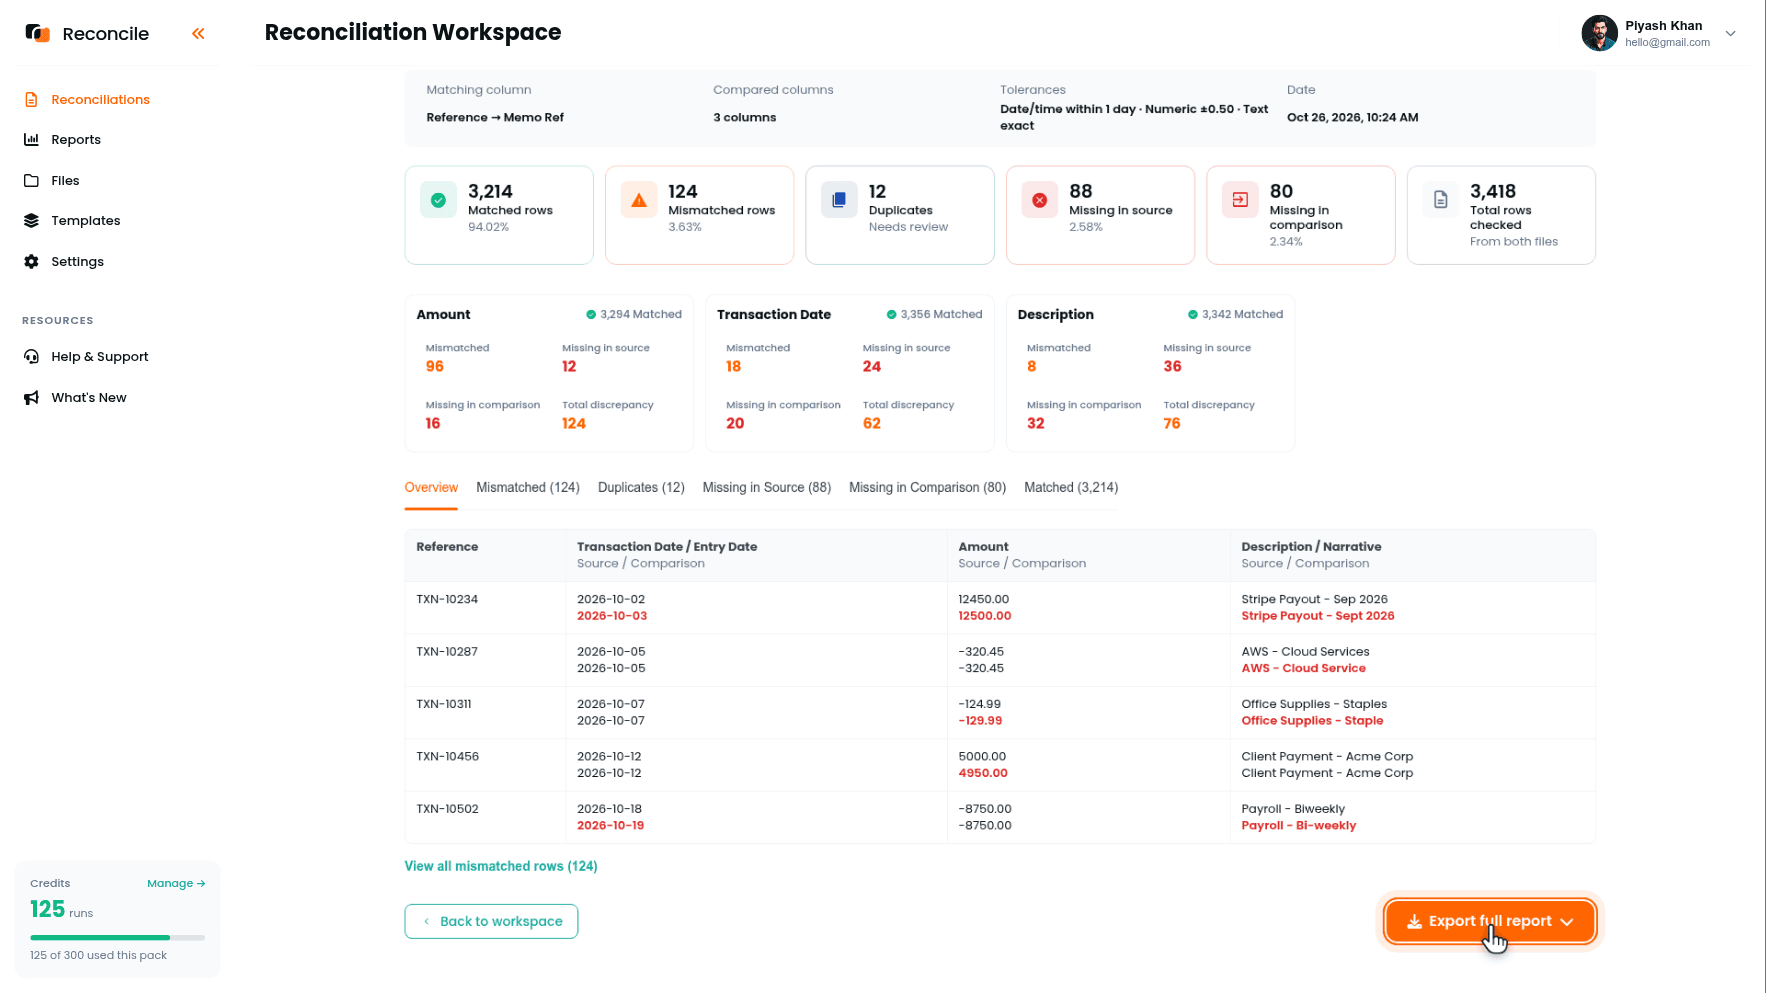
The report opens marked Ready to export, with every row from both files sorted into five categories:
- Matched rows: agree on the matching column and on every compared column, within tolerance.
- Mismatched rows: matched on the matching column, but disagree on amount, date, or another compared column beyond its tolerance.
- Duplicates: the same matching value appears more than once in a file. A transaction entered twice surfaces here on its own, without anyone hunting for it.
- Missing in comparison: bank transactions with no counterpart in the ledger.
- Missing in source: ledger entries with no counterpart on the bank statement.
Total rows checked confirms nothing was dropped. Below the metric cards, a per-column breakdown shows how each compared column performed, so you can see at a glance whether the problem is amounts, dates, or descriptions. Tabs along the top of the results table open each category in full, and the Mismatched tab shows the source and comparison values side by side with the differing value highlighted.
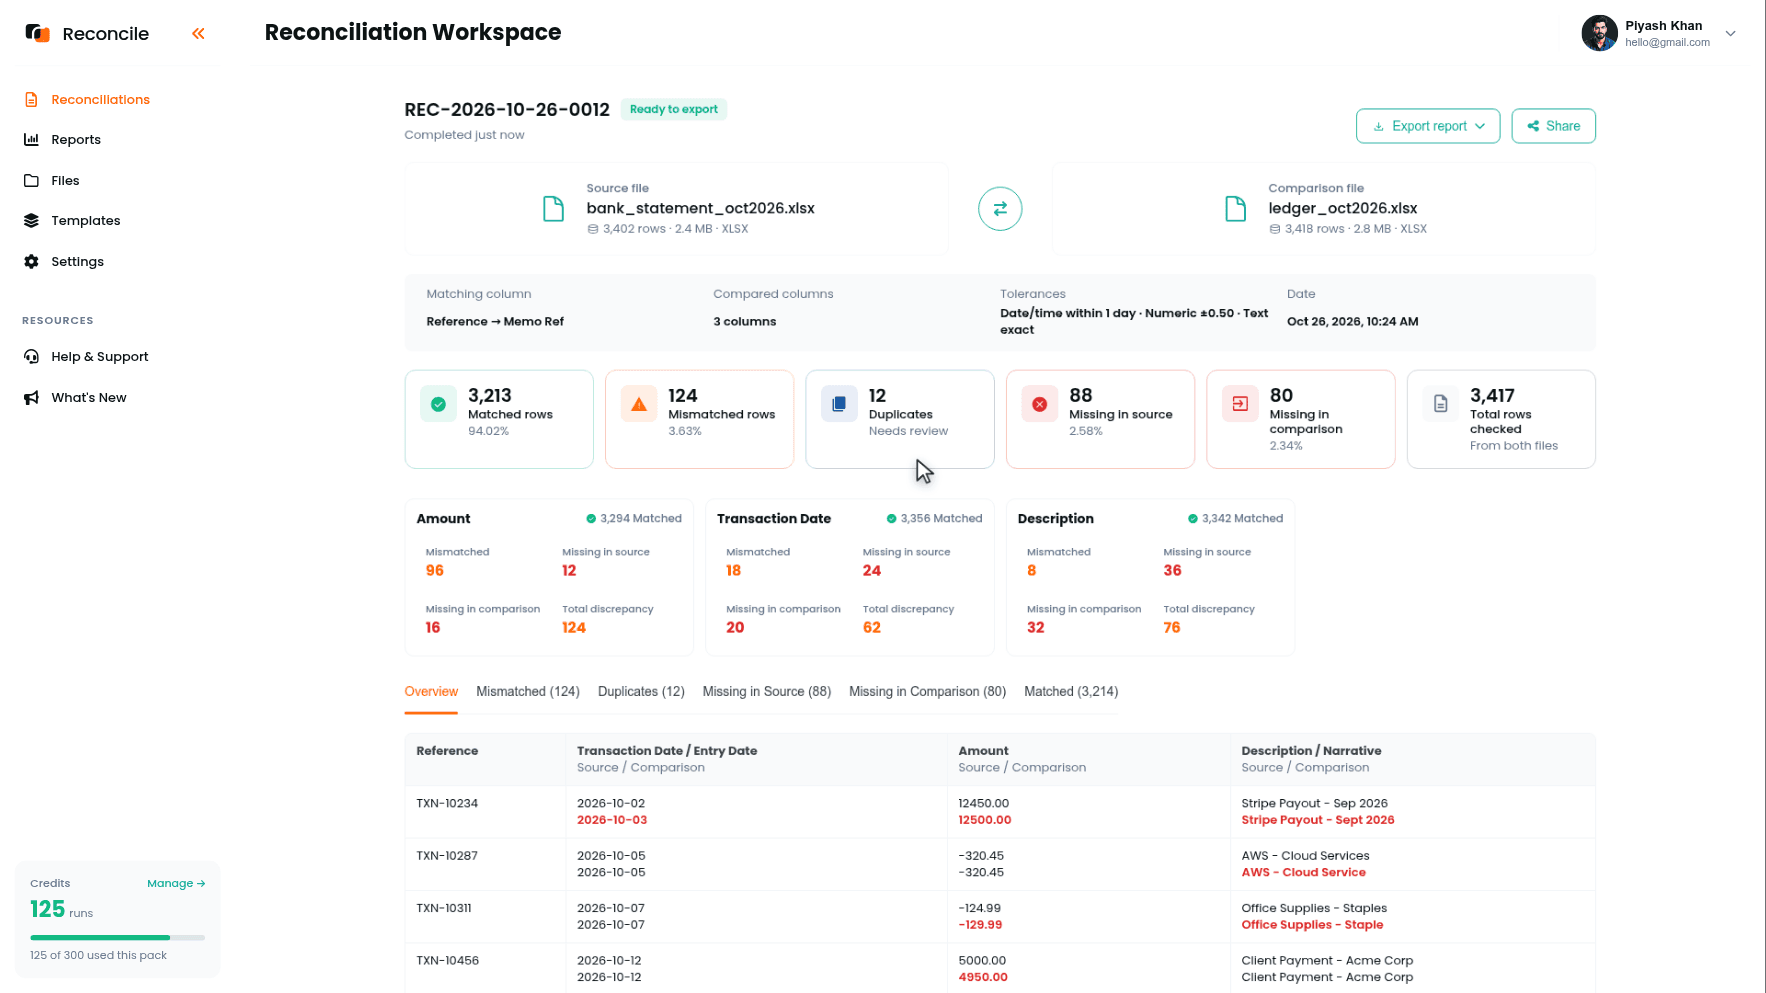
Start with the Mismatched tab, not the missing rows. A mismatched row points to a specific, findable cause: a fee, a partial refund, a data entry error, and the highlighted values show it immediately. A missing row can mean several different things and takes longer to run down.
Step 6: Investigate Each Exception
For every mismatched, duplicate, or missing row, the question is the same: is this a real problem, or an explainable difference?
Common causes worth checking first:
- Bank fees or processing fees on the statement that were never recorded in the ledger. These land in Missing in comparison.
- Timing differences wider than the date tolerance, a transaction dated the last day of the month on one side and days into the next on the other.
- Duplicate entries, the same transaction recorded twice on one side. The Duplicates tab has already isolated these.
- Bundled deposits, a single bank deposit representing several invoices bundled together, common with payment processor payouts. These appear as one Missing in comparison row on the bank side and several Missing in source rows on the ledger side that sum to it.
Step 7: Export the Report
Click Export full report. This produces two files: a PDF report summarizing the run, ready to hand to a client, attach to a month end close, or keep on file for an audit, and an Excel workbook with every row from both files sorted into five sheets, matched, mismatched, duplicates, and both missing lists. Record the explanation for each exception directly against its row in the workbook as you resolve it: explained, needs correction, or still open.
That record is the difference between a highlighted spreadsheet and an actual reconciliation. A highlighted spreadsheet shows where the differences are. A reconciliation report shows what they were and how they were resolved.
Key takeaways
- Only two things are required to start: two files covering the same transactions, and one shared column that identifies a transaction in both. Format, headers, and cleanliness are handled during mapping, not prepared in advance.
- The four steps are the four decisions: upload the right pair, map the fields that describe the same thing, confirm which pair identifies the transaction and how closely the rest must agree, then get the report.
- Put the file being checked in the Source file slot and the file being checked against in the Comparison file slot. The report's Missing in source and Missing in comparison categories read directly off that choice.
- Two files with different date ranges produce missing rows that are not real discrepancies. That is a range problem, not a data problem, and it is worth ruling out before investigating exceptions.
- Tolerances should absorb known, explainable variance, rounding, short timing gaps, without hiding genuine discrepancies.
- Mismatched rows are more informative than missing rows: the report shows both values side by side with the difference highlighted. Investigate them first.
- A reconciliation is not complete until every exception in the exported report carries an explanation. The annotated export, not the raw comparison, is what makes it audit ready.